
Are you worried about how to use Korean kiosks during your trip? You walk into a restaurant, hungry and excited, but there are no staff, only a big glowing screen.
You found a great restaurant using my previous guide. You walk in, hungry and excited. But wait… there are no staff, only a big glowing screen.
Welcome to Korea, the land of technology! Many restaurants and cafes here use self-ordering kiosks instead of cashiers. For tourists, this can be terrifying. People are waiting behind you, and you don’t know which button to press.
Don’t panic. In this guide, I will teach you how to use Korean kiosks step-by-step. It is actually easier than ordering from a human once you know the pattern.
Before we start, make sure to download the official apps here: Naver Map and KakaoMap.

Step 1: Find the Language Button 🌐
The good news is that 99% of kiosks in tourist areas have an English option. Before you do anything, look at the corners of the screen.
- Look for a Flag Icon (🇺🇸 or 🇬🇧).
- Look for the word “Language” or “English”.
Tap it, and the menu will change to English. But be careful—sometimes the most important first step is still in Korean (see Step 2).
Step 2: The Biggest Challenge – “Eat In” vs. “Take Out” 🏠
This is where most foreigners get stuck. Even in English mode, the very first screen often asks you this question in Korean characters.
You must memorize these two words to survive learning how to use Korean kiosks.
| Korean Option | Pronunciation | Meaning | Icon Hint |
|---|---|---|---|
| 매장 (매장식사) | Mae-jang | Eat In (Here) | Often a tray or a table icon. |
| 포장 (테이크아웃) | Po-jang | Take Out (To Go) | Often a paper bag or a cup icon. |
💡 Tip: If you are unsure, usually the Left Button is “Eat In” and the Right Button is “Take Out.”
Step 3: Select Your Food & Options 🍔
Now it works like online shopping. Tap the pictures of the food you want. It will be added to your “cart” at the bottom.
Be prepared for pop-up options: “Spicy level?”, “Add cheese?”, “Hot or Iced?”. If you don’t want extras, look for a “No Thanks” or “기본(Basic)” button.
When you are finished, tap the big colored button at the bottom right. It usually says “Order” or “결제하기 (Pay)”.
Step 4: Payment – Don’t Tap, Insert! 💳
In many Western countries, you “tap” or “swipe” your credit card. In Korea, the primary method is inserting the IC Chip.
Understanding the payment process is the most critical part of learning how to use Korean kiosks successfully.
- Look for the card slot below or to the side of the screen.
- Insert your card firmly with the chip facing forward.
- Do not remove it immediately. Wait until the screen says “Payment Complete” and the receipt comes out.
- If you remove it too fast, the payment will fail.
Final Step: Check Your Number 🧾
Take your receipt! At the top, there will be a big “Order Number” (주문번호).
Wait until your number appears on the screen above the pickup counter, or wait for the staff to call the number. (Sometimes, in small cafes, they might ask you to take a vibrating buzzer *before* you pay and input the buzzer number into the kiosk).
Bonus: The “Table Tablet” (Sit & Order) 🛋️
Recently, a new type of kiosk is becoming very popular in Korea. It is a small tablet attached directly to your table.
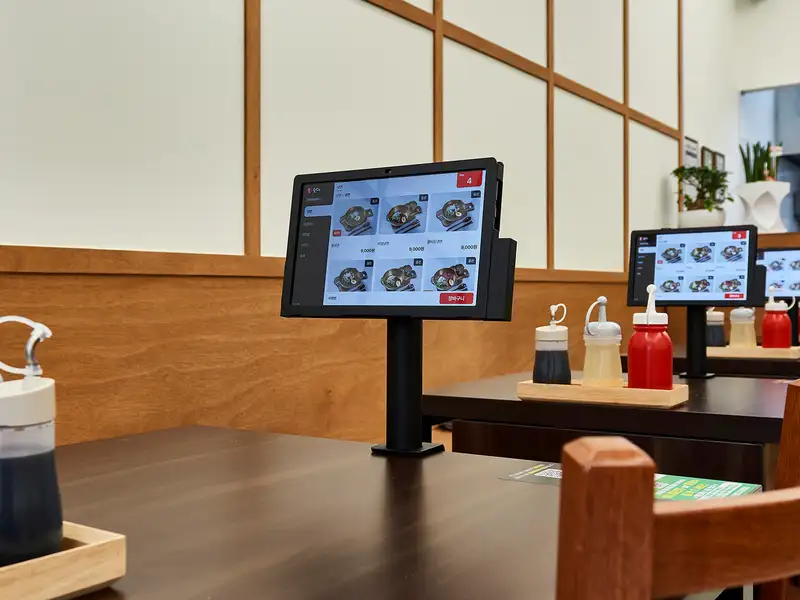
If you see this, you are lucky! You don’t need to stand in line or feel pressured by people waiting behind you.
- How to use: Sit down comfortably, touch the screen to choose your language, and add items to your cart.
- Payment: Look closely at the tablet stand. There is usually a Card Reader attached below or to the side of the tablet.
- Process: Order ➡️ Insert Card at your table ➡️ Wait for food. You can do everything without standing up!
⚠️ Note: In some older systems, the tablet is only for ordering. If there is no card reader at the table, you must eat first and pay at the counter when you leave.
Using a table tablet is the easiest way to master how to use Korean kiosks without stress.
Conclusion: You Can Do It!
Learning how to use Korean kiosks might seem scary at first, but it is fast and convenient. Don’t worry about the people behind you; take your time. Following this guide will help you order delicious food without stress.